We have greatly enjoyed your visits, but starting 2025 we will be moving to WIX.
Follow along on all of our blog posts, videos, and podcasts in one site!
We have greatly enjoyed your visits, but starting 2025 we will be moving to WIX.
Follow along on all of our blog posts, videos, and podcasts in one site!
by Lesdy Dueñez, Shorehaven Elementary
In today’s digital learning environment, Impero has become essential in the classroom and education by enhancing digital learning environments, improving student engagement, and ensuring a safe and focused atmosphere for instruction. Its ability to provide real-time visibility into student activity allows educators to proactively monitor progress, identify struggling students, and offer immediate and discreet support. This post will explore how it works and how you can use it effectively in your classroom.

Impero is a powerful classroom management software designed to help teachers maintain control and keep students engaged in digital learning. With real-time monitoring and browsing restrictions, educators can quickly identify off-task behavior and minimize distractions.
Creating a structured and focused digital classroom can be challenging, especially when ensuring students stay engaged with technology. Impero equips educators with essential tools to monitor student activity in real time, helping them identify and address off-task behavior discreetly without disrupting the learning environment.
For instance, during an independent work session, I noticed a few students straying from their tasks. Instead of calling them out in front of the class, I used Impero’s discreet messaging feature to send them a gentle reminder. Within seconds, they refocused—without embarrassment or interruption. This small yet powerful intervention helped maintain a positive and accountable learning atmosphere. By enhancing classroom management and digital safeguarding, Impero empowers educators to minimize distractions, support student success, and foster a more productive learning space.
Now that we’ve explored why Impero is a valuable tool for educators, let’s dive into the simple setup process to help you get started quickly and efficiently.
Signing into Impero Classroom is a quick and straightforward process. To get started with Impero, open your Chrome browser and navigate to the Staff Apps Folder. Click on the “Impero Classroom” application, then select “Sign in with Google” and log in using your school credentials. Once signed in, you’ll be directed to your Impero Classroom dashboard, where you can begin managing your digital classroom with its various tools and features. By following these simple steps, educators can seamlessly access Impero Classroom and utilize its tools to enhance teaching and learning. Now that you’re set up with Impero, the next step is making the most of its powerful features. From messaging students to screen broadcasting, here are some best practices to help you create an efficient and engaging digital classroom.
To make the most of Impero in your digital classroom, start by using key features that keep students engaged and focused. Messaging students allows for discreet support, while broadcasting your screen or a student’s screen helps guide instruction. Launching websites directly for students ensures smooth lesson flow, and setting up Allow/Block lists minimizes distractions. By incorporating these tools, educators can create a structured, efficient, and secure learning environment that supports student success.
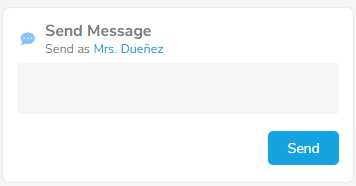
Messaging in Impero is a great way for teachers to provide instructions, give feedback, or redirect students without disrupting the class. Teachers can send messages to individual students or the entire class, but students cannot reply. To send a message, simply open Impero Classroom, select the student devices, type your message, and click “Send.” The message will appear on the selected devices, and students can acknowledge it by clicking “Okay.” This feature helps maintain focus and keeps communication efficient in a digital classroom.
Screen broadcasting in Impero is a powerful tool that helps teachers keep students engaged by sharing instructional content in real-time. Teachers can broadcast their own screen to guide lessons, ensuring all students follow along, or highlight a student’s screen to showcase exemplary work or demonstrate a concept. To broadcast, simply open Impero Classroom, select the student devices, and choose whether to share the entire screen, a specific window, or a browser tab. When sharing a student’s screen, select the student and start broadcasting. This feature enhances collaboration, reinforces learning, and keeps the class focused while preventing distractions.

The Launch Website tool in Impero helps teachers save time by instantly opening a specific website on all student devices, eliminating the need for students to manually type long URLs. To use this feature, open Impero Classroom, select the student devices, and click on “Launch Website.” Enter the website URL and click “Send” to open the site on the selected devices. For frequently used websites, teachers can bookmark them for quick access in future lessons. This tool ensures students stay on task and access the right resources without distractions or errors.

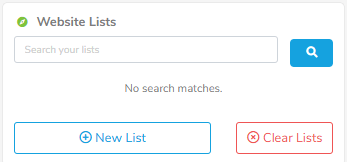
The Allow/Block List feature in Impero helps teachers control student internet access to keep them focused on learning. To create a list, open Impero Classroom, go to Classroom Tools, and select “New List.” Choose either an Allow List, which limits students to approved websites, or a Block List, which restricts specific sites while allowing general internet access. After adding the necessary URLs, save the list and apply it to selected student devices. If a restricted site is attempted, students will either be blocked or limited to allowed websites. Teachers can edit or remove lists anytime to adjust access as needed. This tool ensures students stay on task and navigate only educational websites during class.
Impero is a powerful tool for creating a more engaged, focused, and secure digital classroom. With live monitoring, teachers can proactively support students, minimize distractions, and ensure a productive learning environment. Now is the perfect time to explore its features and see the impact it can have on your teaching. The more you use Impero, the more confident you’ll become in managing your digital classroom with ease. By integrating Impero into your daily routine, you can create a more structured and engaging learning experience for your students. Give it a try and see the difference it makes!
Select the hyperlinks below to learn more about each feature and deepen your understanding.
by Jenny Hayes, Weaver Elementary
Hey there! It’s your Weaver Elementary campus i3 – Jenny Hayes! My role as the campus i3 is to support you in utilizing technology in your classroom. Technology has greatly enhanced my instruction, makes my classroom more fun and engaging, and encourages authentic academic conversations between students. I want these same results for YOU! Today, I’m going to share a powerful digital creation tool that you can use in your classroom to encourage digital creation among your students.
As with all instruction, we want to ensure our pedagogical practices are aligned with research-based standards. For digital instruction, we often look to the ISTE standards. Adobe Express is a great way to personalize learning for your students, engage in differentiated digital pedagogy, and formatively assess your students’ learning at the completion of a lesson. In this blog post, we will discuss what Adobe Express is and how you can use it in your classroom.
Adobe Express is a digital creation tool teachers can use to create dynamic slideshows or infographics to deliver instruction. The platform also includes a bank of premade templates for teachers to use in their content-area classrooms with their students. Teachers can demonstrate how to use these tools with their students and allow their students to demonstrate their knowledge of a learning topic using the digital tools on Adobe Express. Did you know that college graduates with creative skills saw two to three times higher salary increases and greater career trajectory than those who do not have those skills (Sharma, 2021)?

Students can use Adobe Express to engage in digital creation with their content-area learning. They can begin practicing their digital creation skills to prepare them for an increasingly digital future. We can truly prepare our students for the real-world with the use of this digital tool!
Adobe Express stores your created content much like Google Drive. You never have to worry about losing access to the resources you worked hard to create. In this blog post, we will explore some of the features of Adobe Express that you can use with your students.
Explore the “Suggested Quick Actions” ribbon for tools, or click on “Educator Resources” in the vertical ribbon on the left side of your screen to explore resources you can use in your classroom with students.

Let’s look at some resources you may find useful in your classroom!

The suggested quick actions ribbon offers a variety of resources for teachers to use in content creation. Some of my favorite resources in the Suggested Quick Actions ribbon are:
Remove Background – this will remove backgrounds from images


Edit PDF – you can change any PDF to fit the needs of your classroom; I like to create cloze notes!
Generate image- you can use AI to generate an image using descriptions of your choice; you can literally create ANYTHING! (This is hidden in the view all button at the end)

Navigation Tip #1:
Click on the Adobe Express icon in the upper left corner of your screen to get back to the “Home” page!


Educator Resources has so many great templates for you to use with your students! You can edit these premade templates to fit the needs of your content area classroom, or you can simply show your students how to use the tools and allow them to create a product reflecting their knowledge of your content.
Check out this slideshow I made about 5th grade landforms (canyons/v-shaped valleys, u-shaped valleys, sand dunes, and deltas). I used the generative AI function to create the images!
Classroom Applications: Students can make infographics for science concepts, such as the water cycle or sedimentary rock formation, times periods in social studies, a movie poster for a book they read in class, character analysis, etc.
Another great tool you can find on the Adobe Express homepage is Animate Your Voice. If you are familiar with Flip (formerly Flipgrid), then you will LOVE this resource. Once your students click on the Animate Your Voice icon, they will be prompted to choose a character and a background. After selecting their character and background, they can record for up to two minutes. After recording their video, students can download the MP4 and upload it to the learning management system of your choice.
Animate Your Voice is great for:
Navigation Tip #2:
Confused about how to use a template? Each template comes with a short instructional video! You can access the videos by clicking the “Learn” button above the “Educator Resources” button, or you can view the videos when you open one of the premade templates!

Adobe Express is an excellent tool to help students gain an understanding of and practice with digital creation. Teachers can use Adobe Express to enhance their instruction as well as provide students with novel ways to engage with learning content. Once students learn how to use the features of Adobe Express, there are no limits to what they can create to demonstrate their learning. In this blog post, we explored the Suggested Quick Actions ribbon, the Educator Resources template library, and the Animate Your Voice feature. Each of these digital tools can be used to help your students grow in their academic content knowledge and digital literacy skills.
By Kelsey Ray, Bradfield Elementary
Google Docs, Slides, and Forms can be used to engage students in spiral review for end of the year testing. In this blog, educators will learn about how they can use Google tools to create spiral reviews for end of the year testing
In today’s digital learning environment, Google Workspace for Educators has become essential for engaging students. This post will explore how it works and how you can use it effectively in your classroom.
Google Workspace is a collection of tools that can benefit students and staff. This blog will focus on Docs, Slides, and Forms as review tools.
Google Docs is a great tool for letting students practice their typing and writing skills. On TELPAS (Texas English Language Proficiency Assessment System), the students have to type responses. Also, on STAAR (State of Texas Assessments of Academic Readiness) the students have to construct short and extended written responses.
You can use Google Docs to allow students to get hands-on practice typing and writing. The students can type narratives, essays, letters, or any sort of writing on a Google Doc. Students can then use the Suggesting mode to make suggestions for editing and revising.

Google Slides is a tool that students can use to review math word problems and the steps needed to solve them. MAP (Measures of Academic Progress) testing and STAAR testing involves solving math word problems.
You can use Google Slides to have students write their own math word problems. The students will be more engaged because they are creating their own math problems. On the following Slide, students can solve their partner’s word problem. They can explain their thinking and process in the Speaker Notes

Google Forms is a tool that can be used to differentiate spiral review. Teachers can take review problems and put them in a Form with branches based on how the students answer. This allows students to get exactly what they need and no instruction time is lost.
For example, if they answer correctly, the student would be directed to an enrichment activity because they showed mastery on that TEKS (Texas Essential Knowledge and Skills). If the student misses the question, they would be directed to a video or resource to let them review the skill before trying a similar question.

Students in grades 3-12 can use the Google LTI in Canvas to submit assignments. If you work with students in lower grades, you can have them submit their links through a QR code that is connected to a Google Form.
By incorporating Google Workspace into your teaching practice, you can engage students in spiral review. Give it a try, and watch how it enhances learning in your classroom.
Here are some Google Workspace for Educators tutorials if you need support with any of the tools.
Try out one of these awesome tools to engage your students during testing review season!

The Canvas Syllabus Tool is central for maintaining an organized and dynamic course structure. It allows educators to upload and edit their syllabus directly within the platform. This integration ensures that the syllabus remains a living document, accessible and updatable in real time which enhances communication and accessibility for students.
2. Enhancing Student Interaction
Using the Syllabus Tool within Canvas can significantly reduce the time educators spend on administrative tasks by automating and streamlining content updates and integration with other course elements. The tool’s intuitive design is meant to make syllabus management less time-consuming, allowing educators to focus more on teaching and less on course management logistics.
By leveraging these features, educators can enhance the functionality of their syllabus, making it a cornerstone of the course’s structure and an invaluable tool for student engagement and success. This approach not only improves the management of course content but also significantly enhances the learning experience for students by keeping all essential information in one accessible place.
HEY GISD TEACHERS, earn CPE credit for learning from this blog post!
Complete the Feedback form linked below!
Feedback Form: bit.ly/i3pdfeedback
For the presenter name, type “Mike McMullan”!
Thank you!
Our Teaching and Learning Department has worked hard to include content slide decks for all Amplify knowledge lessons this year. Embedded in the slide decks are the constructed response practice so our students have practice from the beginning of the year to ensure plenty of practice.
Adding the content slide decks to a Nearpod lesson allows students to follow along on their devices and respond directly to text in the slide deck. I start out by using the live participation feature so students cannot skip ahead or play around with the slides. Once we get to the portion of the lesson where students need to respond, I switch the lesson to student paced. This allows them to respond to the question, and go through the slide deck if they need assistance with vocabulary words.
Once students are completed with the response, I can generate a report with their responses. This allows me to go back to look for reteach moments before moving on to the next constructed response.
Having students respond to text while improving typing skills is beneficial for all subject areas. Students can practice typing while answering questions in complete sentences. Think about how this could improve student TELPAS scores also!
HEY GISD TEACHERS, earn CPE credit for learning from this blog post!
Complete the Feedback form linked below!
Feedback Form: bit.ly/i3pdfeedback
For the presenter name, type “Maddy Viladevall ”!
Thank you!

Introducing the latest arsenal of tools designed to revolutionize the student learning experience: MagicSchool.ai’s innovative dashboard boasts an array of powerful resources, each meticulously crafted to enhance educational outcomes. Among these, “Raina for Students” stands out as a beacon of guidance, offering students the opportunity to seek answers, generate ideas, and navigate academic challenges with unparalleled ease. With Raina at their fingertips, students can embark on a journey of discovery, tapping into a wealth of knowledge and insights to fuel their intellectual pursuits.
Another tool, the “Writing Feedback” feature empowers students to refine their writing skills with personalized guidance and constructive criticism. Whether crafting essays, reports, or creative compositions, students can now receive timely feedback tailored to their individual needs, fostering continuous improvement and mastery of the written word. Coupled with the “Research Assistant,” which streamlines the process of sourcing information and references for research projects, and the innovative “Chatbot Builder,” which empowers students to create custom chatbots for interview preparation and beyond, MagicSchool.ai’s suite of tools brings a new era of student empowerment and academic excellence.
In addition to empowering students with a wealth of learning resources, MagicSchool.ai also equips educators with robust tools to maintain control and oversight of the learning environment. Through the creation of personalized digital classrooms, teachers wield the ability to curate the educational experience according to their specific objectives and requirements. By selecting and limiting the tools available to students within these classrooms, teachers can ensure that learning remains focused, structured, and aligned with instructional goals.
MagicSchool.ai provides teachers with comprehensive analytics capabilities, allowing them to track student engagement and monitor the usage of various tools in real-time. With access to data on student participation, tool utilization, and time spent within the platform, educators gain valuable insights into the effectiveness of their instructional strategies and the individual progress of their students. The inclusion of a “Moderation Panel” further empowers teachers to maintain a safe and productive learning environment, enabling them to intervene promptly if content or interactions veer off course. Through these innovative features, MagicSchool.ai empowers teachers to orchestrate dynamic and impactful learning experiences while maintaining full control and oversight every step of the way.

Attention educators! Don’t miss out on the chance to revolutionize your teaching with MagicSchool.ai’s student tools. From Raina for Students’ guidance to Writing Feedback’s support, these tools drive student success. Seize control with personalized classrooms and analytics. Act now to transform learning and shape the future!
HEY GISD TEACHERS, earn CPE credit for learning from this blog post!
Complete the Feedback form linked below!
Feedback Form: bit.ly/i3pdfeedback
For the presenter name, type “Mike McMullan”!
Thank you!
 |  |
These interactive platforms collect data in real-time and are digital tools to help with student engagement. They can be used in an asynchronous or synchronous setting. Nearpod engages students through gamifying content, and Pear Deck engages students through various question styles. To compare these two platforms, I looked at teacher ease of use and student ease of use.
Pear Deck can be a Google add-on for classroom use. It is straightforward to use. There are drag-and-drop, multiple-choice, write, draw, and ordering-type questions. It makes a Google Slides deck interactive for students. You can add audio to slides and assign a small group of students or a whole group for student differentiation. If you are used to working with the Seesaw platform, you will be comfortable using Pear Deck. I found Nearpod easier to assign work because you don’t need Google Classroom, and I can connect it to Seesaw. Without having access to a student email (K-2 students), students cannot access the Pear Deck lesson. Since Pear Deck is a user-created slide deck, combining or editing slides is super easy, whereas combining lessons in Nearpod was a bit tricker. I am sure that with more practice, it becomes second nature. Nearpod also connects to Canvas, so taking upper-grade level grades will be even easier than before. By a margin, I think Pear Deck is more accessible for teachers.
Teachers discovering Nearpod or Pear Deck!

Students will love Nearpod’s multimedia presentations and interactive abilities. They can explore a 3-D cell, play Time to Climb, a game to show what they have learned, watch a video presentation, etc. However, Nearpod offers fewer types of questions than Pear Deck. It is also harder to work with on an iPad. Students with Chromebooks should be just fine. Pear Deck offers more ways to answer questions like multiple-choice, draw, write, put in order, etc. It also gives students a way to answer the questions presented to the class anonymously. However, the teacher can always see the students’ names and answers in real time. You cannot go wrong in this specific category with either platform. I would probably present the lesson on Nearpod and assess it on Pear Deck.
Watch how to build a lesson in Nearpod.

I wrote this blog hoping to find a superior student learning platform; however, I discovered two powerful tools that will revolutionize student lessons and empower students. I believe that students using these platforms will take more ownership of their learning and evolve into critical thinkers. As with any new tool, there is a learning curve; to be fair, I have more experience with Pear Deck. But, I can’t declare a winner in this experiment. I believe they will synergize beautifully and create a cohesive learning environment in any classroom.
HEY GISD TEACHERS, earn CPE credit for learning from this blog post!
Complete the Feedback form linked below!
Feedback Form: bit.ly/i3pdfeedback
For the presenter name, type “Patty Naghwai”!
Thank you!
Hello! My name is Melissa Carpenter. This is my 25th year in education. I am a first-grade teacher and a campus i3 at Liberty Grove Elementary. I have a Bachelor’s Degree in Child Development and a Master’s Degree in Applied Digital Learning.
MagicSchool AI for Teachers is an advanced artificial intelligence platform that offers numerous possibilities for educators to enhance their classroom experiences and engage students in unique and immersive ways. The platform’s free version provides over 60 AI tools to generate personalized and original content while simplifying the differentiation process. It is a user-friendly and efficient tool that improves productivity by automating time-consuming tasks. Whether you need to assign a last-minute quiz, develop an IEP, or create math word problems, MagicSchool has a tool to help you do it easily and efficiently.
Sign up for a free instructor account using your school email address and follow the prompts. The dashboard will open when you complete your profile.
MagicSchool offers a variety of tools to enhance teaching effectiveness in any subject, from elementary to high school. Click the table below to explore the complete list of tools and learn how best to use them in your classroom.


The resource hub also features professional development resources to help teachers enhance their instructional strategies and stay updated with the latest trends in educational technology.

With MagicSchool, educators have the flexibility and support to deliver engaging, impactful lessons across all subjects and grade levels, ultimately fostering student success and academic growth.
HEY GISD TEACHERS, earn CPE credit for learning from this blog post!
Complete the Feedback form linked below!
Feedback Form: bit.ly/i3pdfeedback
For the presenter name, type “Melissa Carpenter”!
Thank you!

Need something to keep interest high in the classroom?
Want to make formative assessments fun and easy to do?
Try Kahoot!
Kahoot! is a global learning and engagement platform company that wants to empower everyone, including children, students, and employees, to unlock their full learning potential. (from the website)
Kahoot makes it easy for teachers to review and reinforce concepts through gamification.
You can sign up for free at https://create.kahoot.it/auth/register There are paid memberships with a LOT of items, such as AI Assist, PDF to Kahoot generator, multi-select answers, and Audio in questions but you get all the essentials as a basic, free account. Those essentials include multiple-choice quizzes, images as answers, view reports, student-paced, team mod, question bank, and read alouds.
Kahoot is easy to use! What I like is that it has a large library of already created games! You search for the concept you are teaching and you can filter as needed.

You still need to look over the questions from any games you use. Once you find one you want, you can assign it to students or host a live game. You also have options such as sharing, editing, previewing, or duplicating. This helps if you want to add or delete questions,.

It is possible to also make your own games from scratch. This is great for test review or end of unit quizzes. It also works as a great formative assessment to see what the students are understanding. You can access reports to see how your students did.

There are a lot of gamified assessment platforms out there but Kahoot is my favorite. I like that I can project the game on my screen and we can all see the questions when we are doing a live game. The students can pick avatars and they love seeing them on screen.
Hope you enjoy it as much as I do!
HEY GISD TEACHERS, earn CPE credit for learning from this blog post!
Complete the Feedback form linked below!
Feedback Form: bit.ly/i3pdfeedback
For the presenter name, type “Lesley Perry”!
Thank you!